Mouse DPI, or dots per inch, is a setting that can change your experience with overspeeding to the slowish control mouse. If this is a gaming PC, we know it must respond faster and stay loyal to user commands, as well as provide versatile features. This means that all of your gaming hardware, including the gaming monitor, GPU, processor, and faster SSD storage, must be on the same terms as your company. Allowing change of DPI is one of the things that must be high on higher width and resolution screen whiles need to slide down when move to shorter width monitor with lower resolution to feel and experience the movement of accuracy.
It doesn’t matter which mice you have a higher DPI gaming mouse or a low-level CPI office mouse, the thing that matters for your experience is, the movement of the cursor, speed of pointer, and click register speed, and that’s all that counts to notice our mouse DPI. If your regular mouse on the screen with little handheld pointer aero isn’t moving with the pace you move your hand, you notice a slowish mouse due to strict DPI range. Luckily it can be fixed with a change of slider and you should move to your mouse settings for this business.
Simple Methods To Change Your Mouse DPI
Well, we’re off at light speed to your destination for mouse DPI changing, which is the goal of learning how to change your mouse DPI. There are several options, but the simplest is to use your specific mouse software, which should come with your device. If not, go to the manufacturer’s website and look for the appropriate software to help us with our next steps. There is another option you prefer you could change the monitor resolution to feel comfortable with your high DPI mouse or could get lower for a lower DPI mouse.
Things You Should Know Before Moving Forward To Mouse DPI Settings:
1. Increasing To High DPI
If you are looking to speed up your mouse, this is only possible when you have capable high DPI mice, which is something special about the gaming mouse we review. You should purchase a new high-end DPI mouse that can benefit more than just a dot per second speed or accuracy. However, if you consider an office work mouse with the same level of settings, the SteelSeries Sensei 310 is one of the great ambidextrous mice with wireless connectivity which works fantastic with any work application scroll or click.
2. Decreasing To Low DPI
When you want to slow down from high DPI to low DPI to stabilize the smushy quick cursor, your current mouse will do the job with proper tuning, which we will discuss later. Here’s why you’re uncomfortable with high DPI. The reason is mouse DPI (dots per inch) is a technical term used to describe the resolution of pixels that the cursor travels. In the context of computer mice, it refers to the number of pixels the mouse cursor will move on-screen for every inch the mouse moves in physical space.
When set to a high DPI, the cursor will move across the screen more quickly and with greater precision than when set to a low DPI. This setting can be important when gaming or working with graphics-intensive applications, as it can affect how accurately and smoothly objects are manipulated on-screen. Most modern mice offer adjustable DPI settings, which allow users to customize their experience based on their specific needs and preferences.
Two Methods For Setting Your Cursor Speed On Computer
When you have an office regular mouse rather than a feature-rich gaming mouse, you can use the Windows settings to adjust to decent DPI levels. The steps outlined below will allow you to speed up your standard desktop mouse as well as gaming mouse if you are a simple user, using only the Windows 11’s built-in settings, which are also applicable to Windows 10 computers.
Method1: Windows 11 Mouse DPI Settings (Access And Customizations)
Windows 11 has a different feature that lets you change the mouse DPI settings. This can be helpful if you have a large monitor and want to make your mouse responsive on screen, or if you have a small monitor you could set the DPI to a minimum for an ideal mouse DPI settings. By following the given steps you can easily customize Windows 11 mouse sensitivity scroll speed and more:
- Open the Windows Settings application. You can also do it by pressing the Windows Key and selecting the settings icon beneath the Start menu, or by dialling the combination (Windows Key + I).
- Now, on the left side pane, select (Bluetooth & devices). You’ll see your peripheral mouse settings such as mouse keys, speed, acceleration, and more.
- To reach the slider, we go to the second option, under Primary Mouse Button, which will be labelled as (Mouse Pointer Speed) or Cursor Speed. You must drag this slider all the way to the right for maximum speed. Moving the mouse pointer will make your mouse move faster.
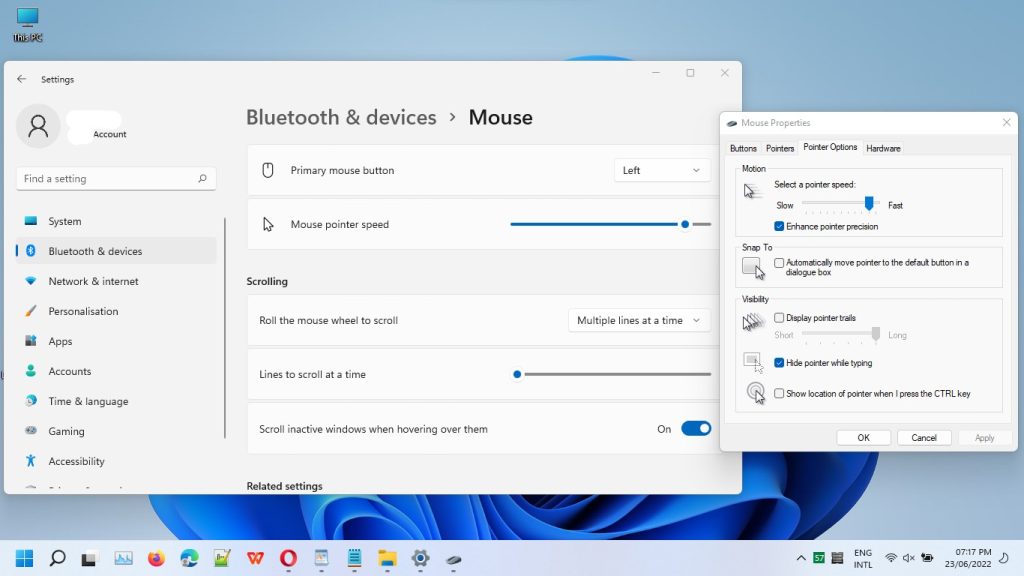
- Then scroll down to the Related section and select the first option, (Additional mouse settings), which opens a control panel window with all of your mouse special settings like enhanced pointer speed (DPI settings).
- To adjust the motion settings (DPI) of your mouse pointer, navigate to the (Pointer Options) tab in this easily accessible control panel. It will be available alongside the Wheel tab and Pointers. You can get help from the screenshots attachment.
- There will be a slider labelled “Select a pointer speed:” You can move this slider to the right, just like we did with the cursor slider in the previous steps.
- With this slider, you can make your mouse faster or slower by adjusting the pointer slide, which is simply the DPI for your regular mouse.
Method2: Change And Customize Your Gaming Mouse DPI
If you have a high-performance mouse, things are a little different than simply changing the Window’s setting. We must examine actual software that restricts your mouse from certain activities and enables its feature with specific settings.
With more than two buttons and a dedicated DPI changing switch underneath, we can easily manage what we want to do with our gaming mouse at any certain point. This is the specialty of high-performance gaming mice that is designed for gaming.
Each high-performance mouse should have its software that controls various aspects; this may differ between brands but not models. If you want more control over your mouse, go to your gaming mouse control panel, also known as mouse software.
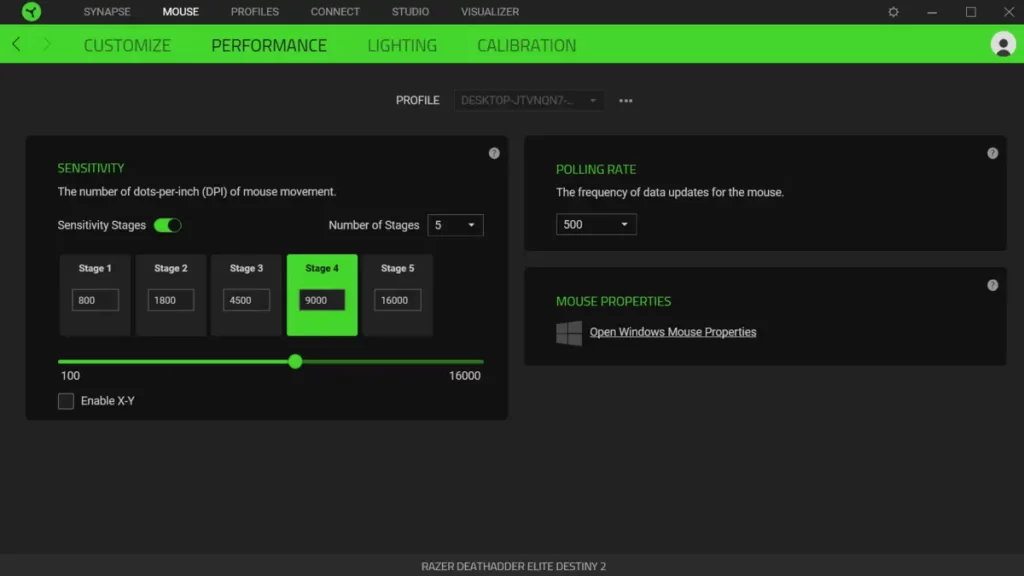
If you have a Razer mouse, it will use Razer’s Synapse software, which allows you to customize the mouse’s speed, functions, lighting, and DPI. Similarly, if you have a Logitech mouse, you must go to the Logitech G Hub (gaming software). So, if you have a different manufacturer’s mouse, there should be some sort of customization software with a catchy name that configures your mouse speed, DPI, and features.
Procedure: Visit G HUB To Change Your Logitech G502 Lightspeed DPI (Gaming Mouse)
Here’s an example of how to change the DPI from mouse software using our Logitech gaming mouse. I’m using my Logitech G502 Lightspeed to demonstrate how to change DPI settings.
You need to open up the Logitech Gaming Software; G Hub and begin following these simple steps to configure DPI sensitivity to make it fly across your screen or reduce it to your taste.
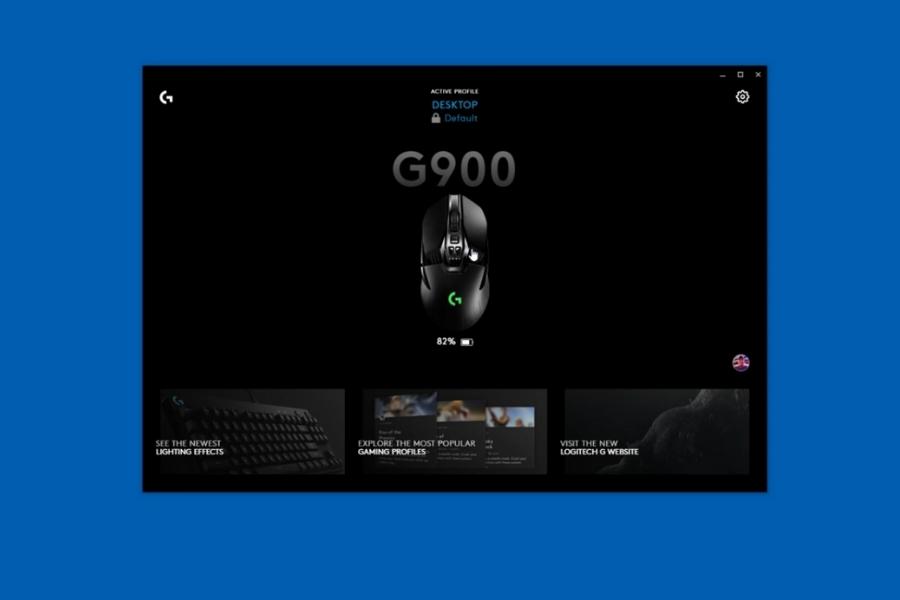
1. When you launch the G Hub software, you’ll see your mouse image appear on the software. To reach the DPI sensitivity settings you need to click on your mouse image.
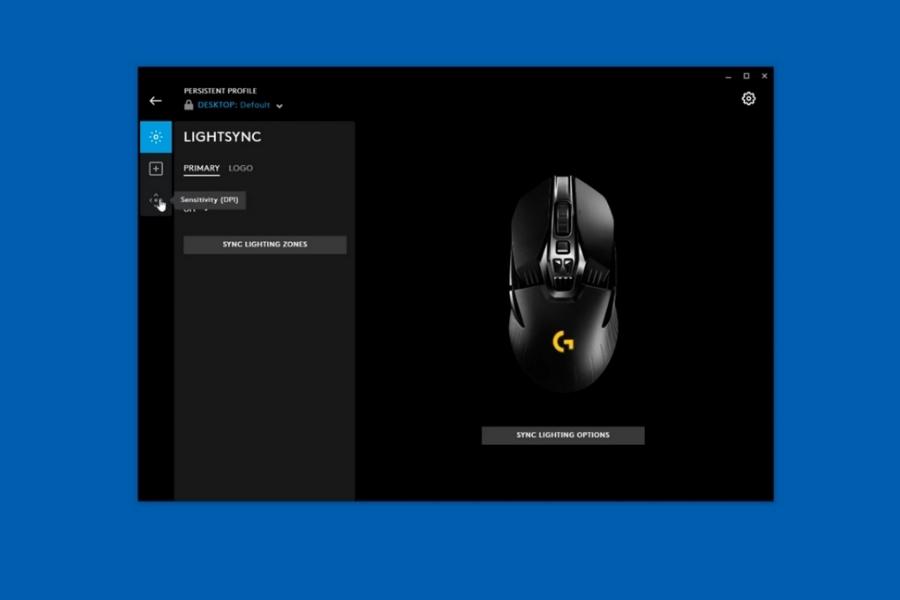
2. Then click on the Sensitivity DPI icon from the Persistent Profile panel which leads to the sensitivity (DPI) settings.
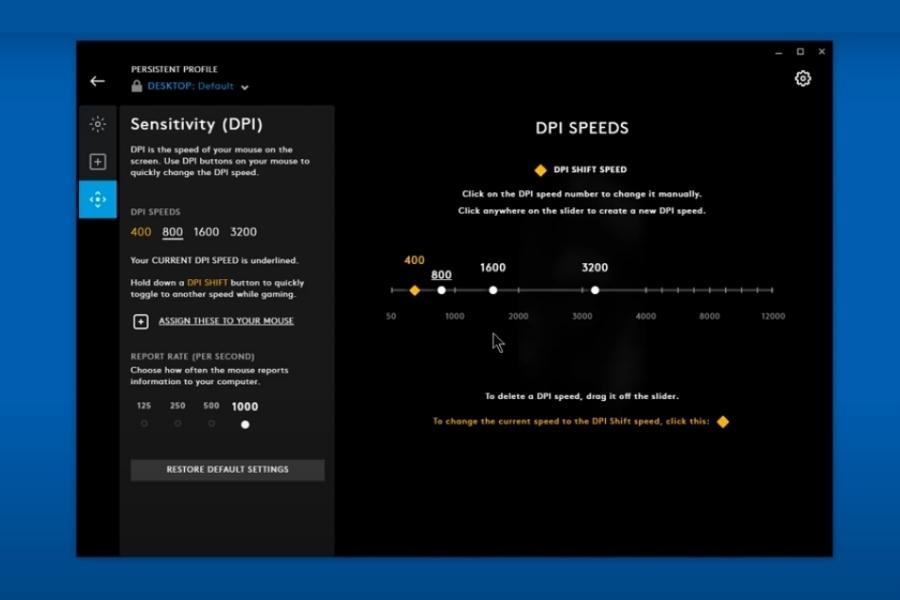
3. To change your gaming mouse DPI, drag the DPI slider to the right or position it anywhere you feel comfortable with your mouse speed, which basically displays the entire DPI supported by your mouse model.

4. You can also use shift to assign a button to the specific DPI setting, which is the orange slider used to change the DPI. To do so, you need to click on DPI shift and it will take you to the button Assignment screen.
Last Tips:
In the button Assignment, you have the freedom to assign any button to work as your DPI changer other than dedicated DPI increase and decrease buttons. You can also return if your new settings are too fast or too slow for your liking and make further changes.