Windows 11 has many new features and improvements over Windows 10. If you want to learn, how to install Windows 11 on a new PC, here you are at the right platform to learn everything with a pretty basic step-by-step guide. In this article, I’ve provided simple guidelines for you to easily accomplished a making of a bootable USB pen drive for the new Windows 11 operating system (OS).
The updated user interface and overall UI and Graphics of Windows 11 are among the most noticeable changes. which includes a redesigned start menu and taskbar The start menu now includes a search bar at the top to help you quickly find what you’re looking for. You can also resize it to make it larger or smaller to suit your needs. The taskbar has also been updated, and you can now pin apps to it so they’re always accessible.
Another big change with Windows 11 is that it’s now possible to run two apps side by side and now you can run Windows Apps and Games without Emulator. These new changes are perfect for multitasking and make it easy to work on two things at once. You can also snap windows into different sizes so they take up just the right amount of space on your screen.
Windows 11 security is also Improved and so many notable new features are added. Overall Performance is also improved and makes your PC a bit faster. But the requirements of Windows 11 are more enormous than in previous generations, this now included more resources to settle in an ideal environment which means some PCs can’t meet the minimum requirement of Windows 11. These requirements are listed below for you to check for compatibility with your PC.
Supported System Requirements For Windows 11
To successfully run Windows 11 on your computer, your PC must meet the minimum requirements, but for smooth running with excellent computing experience your PC should follow these requirements:
Processor (CPU): 1.8 GHz Quad-Core or Faster.
RAM: 8 GB RAM or more and Windows 11 has no support for (32-bit hardware.
SSD Storage: 80 GB Minimum
UEFI/GPT-Based Storage: The partitions on your storage drive must be formatted as UEFI or GPT.
System Firmware: Secure Boot enabled, your BIOS firmware should be in UEFI, not Legacy.
TPM: Your PC hardware must have the latest Trusted Platform Module (TPM) version 2.0 (AMD and Intel CPUs security-related).
Chipset: Processor with DirectX 11 Ultimate (WDDM 2.0 driver) with Shader Model 5.0.
Monitor Resolutions: 720p (HD Screen) greater than 9” diagonally, 8 bits per color or higher.
Internet Access: (WiFi/5G/Ethernet) Internet connection for product activation and Microsoft Accounts.
…
For a further and complete list of supported processors, go to the official website and click on the link “Windows 11 Specifications.”
You can also Assess Upgrade Eligibility to see if your PC meets the Windows 11 minimum system requirements and is eligible for the upgrade. To help with this, install the official PC Health Check app for Windows 10, 8, and 7 PCs.
In addition to diagnostic checks, there is a one-button method for determining upgrade eligibility for Windows 11. You can get the information from within your current Windows 10 OS by going to Settings and System, and About.
This is the most basic method for determining upgrade eligibility and will be accessible via Settings > Update & Security.
…
How To install Windows 11 From USB
To install Windows 11 on a computer running Windows XP, Vista, Windows 7, 8, or 10” you must first obtain the media creation tool from Microsoft’s website. It is the most fundamental step that must be performed by yourself. You can proceed with the process once you have downloaded the Windows 11 ISO or Windows media tool. However, for custom PCs, a product key is required for activation, whereas OEM manufactured PCs, such as laptops, will activate automatically once installed on your device.
Windows 11 is the latest version of Windows, released on 5 October 2021. It includes several new features, such as the ability to run multiple windows at the same time, as well as the ability to run Android apps and games without the use of an emulator. This is a significant step forward for future computers and will enhance the user experience for next-generation computing as all-in-one devices.
In difference Windows 11 is an enhanced version of Windows 10 with so many new and many advanced features for user experience. You will hang to it for a long time before it gets to the next upgrade. This is the ultimate OS that is supported by three major processor types, Intel, AMD, and Qualcomm processors.
There are a few things you should know before downloading Windows 11. To begin, it is not available as a standalone download as ISO files; instead, you must upgrade from an earlier version of Windows or get the installation media for a manual upgrade.
To see if your Windows version is eligible for the free upgrade, open Settings and navigate to Update & Security > Activation. If your Windows version is eligible, you’ll see a message saying “Windows 11 is supported by your PC or device.”
Creating a Bootable USB Drive for Windows 11
There are several ways to achieve your goal of installing Windows 11 on a PC. Microsoft has simplified the process by categorizing it into three types. You can select an option based on your needs and the needs of the system.
Three options for Windows 11 installation:
1- Windows 11 Installation Assistant
This is the easiest option for installing Windows 11 on your current device. When your computer satisfies the Windows 11 device specifications and terms of upgrades and supported the minimum requirements. You can smoothly transition to the latest Windows 11 OS.
Requirements for Installation Assistant’s:
- Your current PC must be running Windows 10.
- Your Windows 10 license is required for the transition of all features.
- Your PC must have 9 GB of free disk space in Drive: C to download Windows 11.
Usage and Installation:
After you’ve downloaded the Installation Assistant, run the setup file. The tool will confirm that the device hardware is compatible and displays the license terms. Accept and Install. Then the tool will be ready, and you will need to restart your computer to complete the installation on your computer. It may take some time to install, and your computer may restart several times. Make certain that your computer is not turned off.
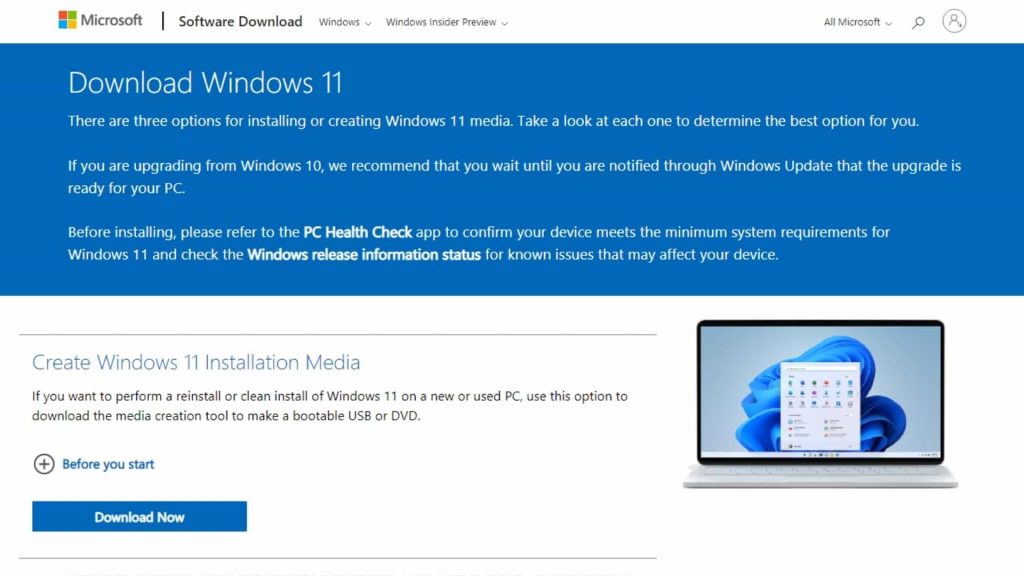
2- Download the ISO image of Windows 11
This option is for users who want to create bootable installation media for personal computers and for the use of the virtual machine (ISO file) to install Windows 11. This is a multi-edition ISO that requires your product key to unlock the appropriate edition and the following are the requirements.
Requirements for Installation of ISO image:
- Make sure your PC has an internet connection.
- Sufficient data storage is available on the computer for downloading the ISO file.
- A blank USB of least 8 GB and recommended 16 GB to create a bootable disc.
- Ensure that the PC you want to install Windows 11 has only support for 64-bit CPUs.
Usage and Installation:
- When downloaded, locate the folder where you downloaded the Windows 11 ISO file.
- Then use any third party or Windows Disk Image Burner to create the installation media.
3- Windows 11 Installation Media
This option is fairly simple and easy when it comes to creating a Windows 11 USB. The process involves downloading of Windows 11 media creation tool to create a bootable USB. This is useable if you want to reinstall or clean install Windows 11 on a new or used PC.
Requirements for Creating Windows 11 Installation Media:
- You’ll need a license key, (activation key) for Windows 11. If you already installed Windows 10 OS is activated then the system will automatically fetch this key for Windows 11 upgrade.
- An active internet connection will be required to process.
- Your computer must have at least 80 GB of storage space.
- For all ISO file hosting, the USB drive must be at least 16GB in size.
- Windows 11 only works on 64-bit hardware, your computer must have a 64-bit CPU.
Now that you’ve learned about all three types, we’ll walk you through the process of creating a Windows 11 bootable USB drive using the Windows media creation tool.
Creating Installation Media: Windows 11 Bootable USB PenDrive
To create installation media, you’ll need to use another PC. Run the media creation tool as an administrator on your borrowed PC after it has been downloaded and agree to the license terms.
Guidelines for Windows 11 USB with Installation Media Tool:
- To make a bootable drive for Windows 11 installations, you will need a PC with an internet connection, and an 8 GB USB drive, which we recommend 16 GB.
- Connect your 16 GB USB drive to your borrowed PC and format it as exFAT.
- Go to Microsoft’s website and download the Windows 11 Media Creation Tool. It will be in the form of an executable file called “MediaCreationTool.exe.”
- Run this program once it’s finished installing.
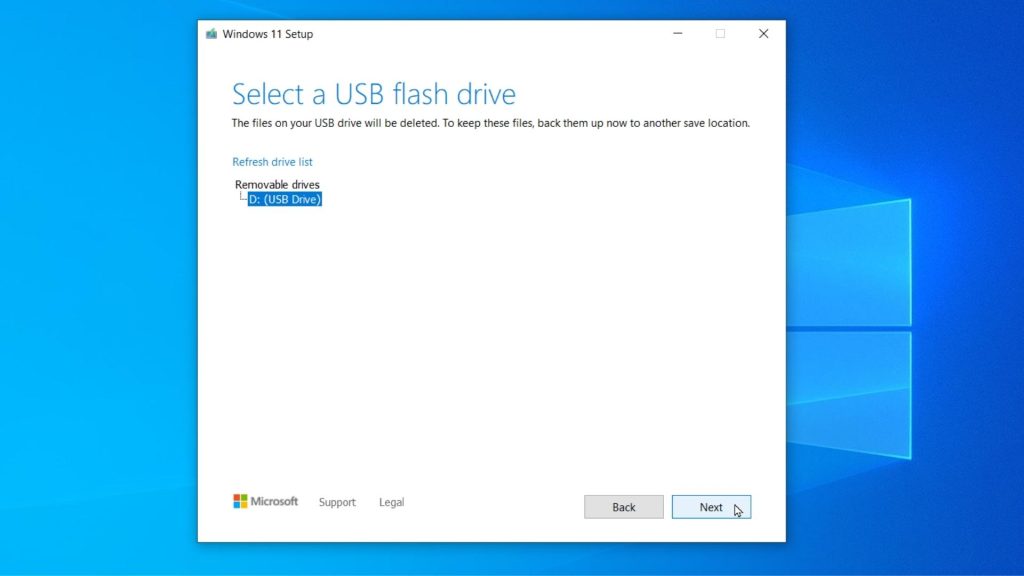
- A screen will appear showing two options; USB flash drive and ISO file.
- You should check the option with a USB drive to make it bootable.
- Now click on the Next button and confirm your choice of a USB drive.
- After that, the Windows 11 media creation tool will begin downloading Windows 11 onto the inserted USB.
- This process can take up to four hours, and you can track the progress from the screen.
- Once completed to 100%, you will see a message, your USB flash drive is ready.
- Click Finish and then remove your flash drive, which has now been converted into a bootable USB with Windows 11 OS.
Clean Installation of Windows 11 on a PC from a Bootable USB
To clean install Windows 11 on your PC from a bootable USB, you must change the boot order so that the USB drive is recognized. To do so, go to the computer’s BIOS by turning it off, and then on the next boot, follow these quick tips.
- Start the computer and repeatedly press the F9 or F11 keys until you enter the UEFI/BIOS; this may vary, but most computers have F2, F8, F9, Escape or Delete as it starts keys. You can check your PC on the manufacturer’s website to see if the UEFI or BIOS controls are activated at startup.
- Navigate through the menus until you find the boot control section, which is usually in a subsection of Advanced options.
- Modify the boot order so that the USB storage device takes precedence over your hard drive or solid-state drive. In the end tab, save and exit, and restart your computer from the UEFI/BIOS page.
- Now that your PC pickup the connected USB flash, you can now install Windows on your PC.
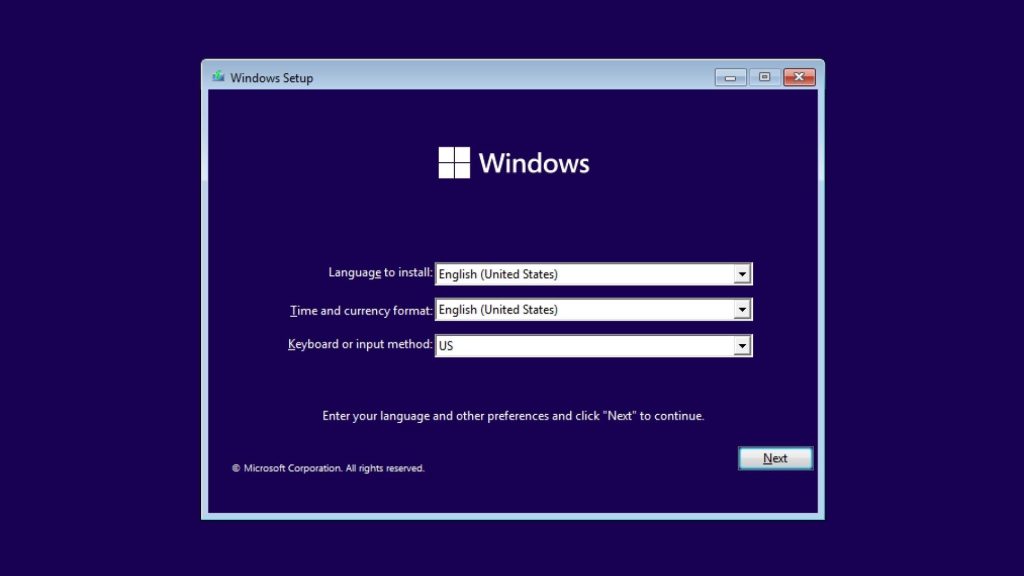
- When Windows 11 Editions menu appears, follow all of the on-screen instructions. They will show you how to format and create partitions on your hard drive for the installation of Windows 11 Editions.
- Do not add your product key unless you are using a custom-made PC, Windows 11, automatically pick up the already registered product key from hardware.
- Now when installation process begins, ensure that no external drive other than a bootable USB is connected to the computer. If this occurs, gently unplug the connected devices from your PC.
- When Windows 11 is installed and the bootup screen appears, sit back and wait for the setup to complete. It will take approximately 20 minutes to complete the customization and setup.
- Once completed, the Windows 11 home screen will appear on the screen, and you will be able to use the entire new operating system. Enjoy.
Frequently Asked Questions
Can I install Windows 11 without TPM?
Windows 11 operating system requires a Trusted Platform Module (TPM) processor to provide security features. If your computer doesn’t have a TPM, you may be wondering if you can still install Windows 11. The answer is yes, you can install Windows 11 without a TPM, but some of its security features will not be available. Without a TPM, your computer is more vulnerable to attack and your data may not be as protected. If you are not comfortable with this increased risk, you may want to consider installing a TPM chip or using another security solution.
Why would I want to install Windows from a USB drive?
There are several reasons you might want to install Windows from a USB drive. Perhaps you want to install Windows on a new computer or an old PC that doesn’t have a CD or DVD drive. Whatever your reason, installing Windows from a USB drive is easy to do and can be done using either a Windows installation disc drive or a USB flash drive. To install Windows from a USB drive, you’ll first need to create a bootable USB drive. You can do this by using the Microsoft Media Creation Tool, which is available for free download from Microsoft’s website. Once you’ve created the bootable USB drive, simply insert it into the computer you want to install Windows on and follow the on-screen instructions.
Which is better for gaming, Windows 10 or Windows 11?
Windows 10 and Windows 11 are both great for gaming, but there are a few key differences that may make one better for you than the other. Windows 10 is more user-friendly and has a ton of built-in features that make it great for gaming. Windows 11 is newer and has some improvements over Windows 10 that may make it better for gaming, such as DirectX 12 support. Ultimately, it comes down to what you prefer and what games you want to play.
Is upgrading from a 32-bit to a 64-bit edition of Windows allowed?
Sadly, Windows 11 is 64-bit, which means your Windows 10 32-bit upgrade is not possible. Windows 11 is strict that can only be installed on a 64-bit architecture and has some other requirements that you should look into before upgrading to the new Windows OS. However, if you have compatible hardware and a 64-bit processor, installing Windows 11 OS, offers improved performance, security, and the ability to run Android applications.
How do I force a USB drive to install Windows 11?
There may be times when you need to install Windows 11 onto a PC that doesn’t have an optical drive. This can be done by creating a Windows 11 installation USB drive. However, sometimes the PC won’t recognize the USB drive as a valid installation source. In these cases, you can use a program called Rufus to force the USB drive to install Windows 11.
Does my PC meet Windows 11 requirements?
Windows 11 has many strict requirements that are more stringent than ever from the previous generation of Windows and even more stringent than Windows 10. Windows 11 requires a 64-bit CPU, at least 4GB RAM, UEFI/Bios with secure boot, an SSD, a GPT-based partition, and other components. You can check your device compatibility by following the complete list for more details before installation.
What are the PC requirements for Windows 11?
The basic PC requirements for Windows 11 are as follows: CPU with 1.8 gigahertz (GHz) dual-core on a compatible 64-bit architecture from Intel, AMD, and Qualcomm ARM-based processors (SoC). Remember that Windows 11 does not support 32-bit processors and requires TPM security for settlement. To run smoothly, the RAM must be at least 4 gigabytes (GB) or greater, and we recommend 8GB. The display must have a minimum resolution of 720p. The graphics should be DirectX 12 compatible, and the storage should be SSD with 80 GB for all updates and drivers to install Windows 11.